Bokeh and blur
It's all about dreamy backgrounds...

An arty kākā, taken with a very wide aperture. This is not the normal settings or lens I'd use for wildlife photography, but in this case it worked a treat. (Sony a7riii, 50mm, f/1.4)
This week on the Art of Birding Wildlife & Nature Photography Challenge, we're tackling bokeh and blur. When I was first starting out as a photographer, I adored photos with a dreamy, buttery smooth background and a subject in sharp focus. But I struggled to replicate the look.
I eventually discovered there is more than one way to achieve it. Two techniques are free and the other costs lots of money. Let's chat about the free ones first!

Tūī on Muehlenbeckia with a soft green backdrop (Panasonic GX8 (4/3rds), 400mm, f/6.3)
Regardless of your camera, its settings, and your abilities, its possible to get out-of-focus backgrounds by being smart. No you don't need to get into the physics of why (but it is interesting if that's your thing). The secret is to get your subject close to the camera and ensure the background is waaaay in the distance, like in this photo of a tūī. This was taken at Zealandia (if you're familiar with the sanctuary) on the path leading from the Takahē lawn up to the Weka fence. To the right, the bank falls away to the wetlands There are scrubby trees at eye-height on the edge of the path and below and beyond them are the low-lying wetlands. In the distance are the green hills of the steep West Scarp. I love shooting here! If a bird lands on top of the nearby trees, the background is far, far away and creates a beautiful green blur pretty much regardless of the settings.
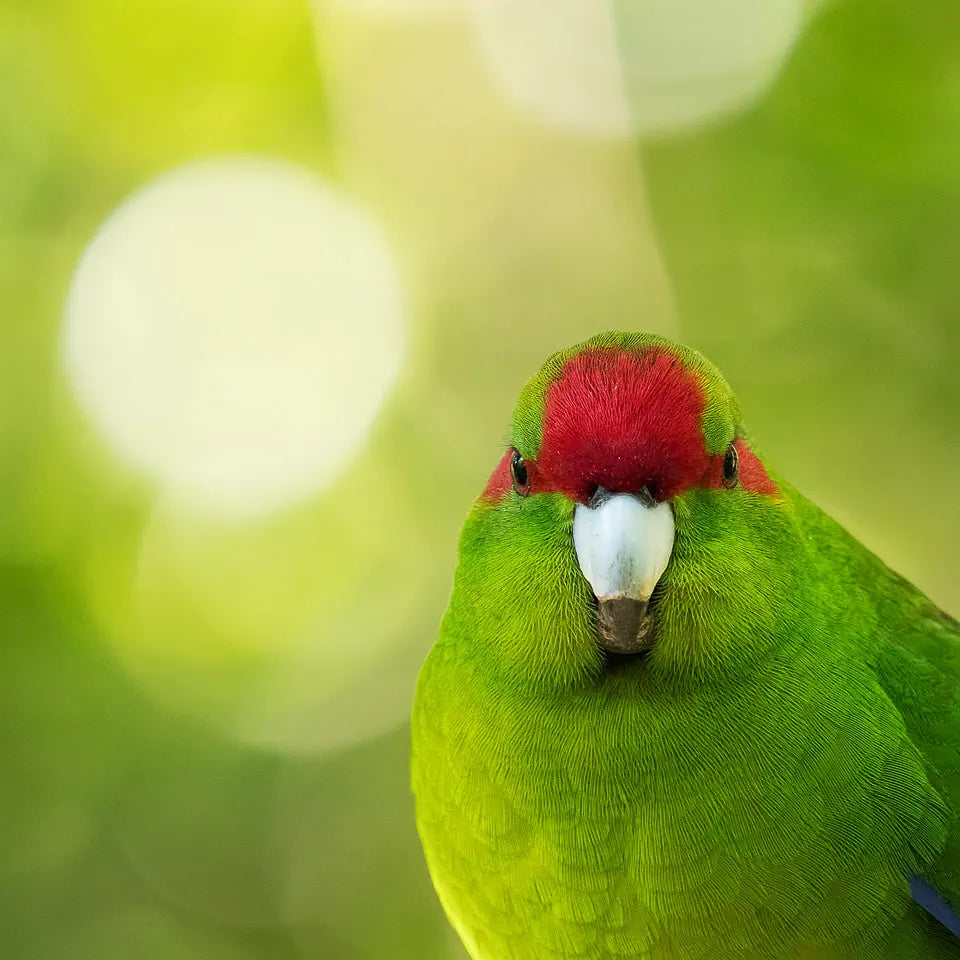
In dappled light, a distant background (or wide aperture) can show attractive softly focused patterns, known as bokeh. This photo was taken at the kākāriki feeding branch where you can get close to these curious birds and the background is in the distance. (Panasonic GX8 (4/3rds), 280mm, f/5.6.)
You can increase your chances of success by paying attention to your aperture, rather than shooting on Auto. Learning a bit more about how your current gear works may save you an expensive purchase. You want the aperture to be as wide as possible. This decreases the range that will be in focus. To get a wide aperture, you'll need to switch to Aperture priority mode (A or Av) or Manual mode, and set the aperture to the smallest number that the lens allows.
<pedant mode on>For the pedants out there, yes I know that it's actually 1 over the number, and so its the biggest number, but the reality is that people refer to just the denominator.</pedant mode off>
-
Aperture f/5.6
-
Aperture f/7.1
-
Aperture f/9.0
-
Aperture f/11
-
Aperture f/14
-
Aperture f/18


[Update Oct 16, 2020] At the above-mentioned location at Zealandia recently, I took a series of photos in Aperture-priority mode with my 100-400mm lens (set at 400mm) as if there was an interesting bird sitting on the foreground branches. (In this mode, as I changed aperture, the camera automatically changed shutter speed and ISO to ensure the same exposure for all photos in the series). For each photo I narrowed the aperture by a couple of clicks. The largest aperture on this lens is f/5.6, which is not that great but given how far away the background is, it still gives a nice blur. Even at f/18 the background is still nicely defocused (although its unlikely you'd want to use f/18 for wildlife).
You'll start having more reliable success if your lens is capable of apertures like f/1.4 and f/2.8. If you're using a 4/3rds or APSC camera, rather than a full-frame camera, the effective aperture will be narrower (ie the amount of blur will be lessened) even with wide-aperture lenses (this was a sad realization with my 4/3rds camera when I got an f/1.4 lens and I still wasn't getting that blur).

A toutouwai basking in late afternoon wintery sun. Despite the twigs and leaves surrounding the bird, the long lens and wide aperture, put everything but the birds eye into blur. Sony a7riii, 400mm, f3.2.
If you find you're frustrated by your gear, even when being smart about how you're shooting, this is when you start considering getting a lens that has a wide aperture. And usually when you start gulping when you look at the price and the weight. They're expensive and they're heavy. Don't consider getting one until you've exhausted all other techniques, such as the ones above, and that you understand what aperture and focus depth mean (otherwise you might not get the best out of your expensive purchase). But if you're serious about getting that look and having the ability to get it when you want it and not just when the conditions allow, it's well worth it. I must admit, I've drunk the KoolAid and don't regret it for a second.

Dahlia with added texture, shot with a Lensbaby Sweet 80. Because its a completely manual lens, I don't have a record of the aperture used but it was probably f/1.8. (Sony a7riii, 80mm)
One more affordable option that's worth considering is a Lensbaby lens, like one of the Velvet or Sweet lenses. Not only do they have wide apertures, but they also allow for special effects and can be a lot of fun to play with. You need to manually focus them though. They really are a lot of fun and you can even get them for your iPhone.

By using a cardboard template over my lens with a star shape cut into it, I made this star-spangled effect from the Christmas tree lights. (Sony a7riii, 50mm, f/1.4)
And finally, a fun thing to try is making patterned bokeh. You can buy Lensbaby templates to do this, or you can go old-school and cut up some cardboard to fit over the end of your lens. Simply cut a pattern like a heart or a star, ensure the edges are taped so no light sneaks around the edges, and set up a scene with your subject close to the camera and the background far away. Set the aperture to wide if you can. The key is to have something sparkly in the background like the Christmas tree lights in the photo above. You'll need to experiment a bit and you might have to manually focus, but if you succeed, your Christmas cards will be sorted this year!
If you try out any of these techniques, do leave a comment and let us know how you got on.
If you try out any of these techniques, do leave a comment and let us know how you got on.